August 19, 2008

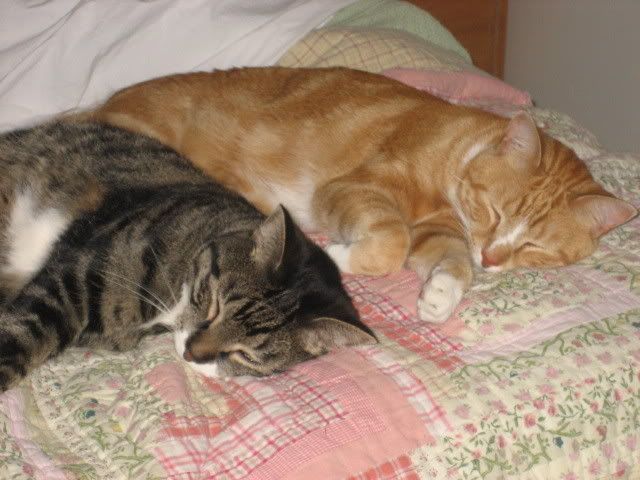
Rest in Peace, Gonzo


Our sweet boy Gonzo has left this world.

I wish I had a better photo that captured his indominable spirit, fearless sense of adventure and deep love for his family but he looks so peaceful here, curled up with his friend Merlin.

Gonzo was a part of Tom's family since he was a tiny foundling kitten, and we took him in after he lost his mother and father. He loved to jump into our laps and into our cars and he always told us when we were "doing it wrong." He continued to live life on his own terms, up until the very end when he left us to find a spot to rest his paws forever.

We miss you, Gonzo, and we hope you find peace where you are now.

TWD: Grab a Granola Grabber

I didn't realize how many recipes I had already made from Dorie Greenspan's Baking: From My Home to Yours until I joined TWD. This is another one that I baked last year. I wasn't crazy about the grabbers then and my opinion didn't improve much this time, but they're not a bad cookie. I just think that in the same basic flavor category, I prefer a really good oatmeal-raisin cookie (I have one that I love from Cook's Illustrated - will have to post it in the future).

Nevertheless, the idea of using granola in a cookie is a bit unique and a good way to use up granola if you have it in the house. I make my own granola*, which includes dried fruits. Dorie suggested using fruit-free granola because the fruit in packaged ones is often dry but since mine is fresh, there seemed no reason to do so. The cookies were chewy and chock-full of nuts, fruits, oats and chocolate chips (my addition). A nice enough cookie, but as I said above, I think I'll stick with oatmeal cookies.

I posted yesterday about the heavy cream and fruit that I bought upstate over the weekend. I made a fresh apricot ice cream that complemented the grabbers nicely since my granola had dried apricots in it.

Thank you to Michelle of Bad Girl Baking for choosing the Grabbers this week and giving me another opportunity to try them out. You can find the full recipe on her blog.


*Homemade granola is super easy! Plus it makes your kitchen smell amazing while it bakes. Here is my basic recipe:
4 cups old-fashioned oats
2 cups sweetened coconut
2 cups sliced almonds or other unroasted nuts
3/4 cup canola or vegetable oil
1/2 cup honey or maple syrup
1 tsp cinnamon
3-4 cups dried fruit (any combination of: diced apricots, diced figs, cranberries, cherries, golden raisins or currants)
1 cup roasted unsalted cashews (or other nuts) (optional, if you like extra nuts)

Preheat oven to 300 degrees.
Mix the oats, coconut and almonds together in large bowl.
In small saucepan, combine the oil, honey and cinnamon. Heat gently, stirring, until fully melted and combined.
Pour the liquids over the oat mixture and stir well until all the oats are coated. (Hands are sometimes helpful).
Pour onto a 13x18-inch baking sheet that is lined with wax paper, parchment or silpat.
Bake, stirring occasionally, until the granola is golden brown and very fragrant, about 1-1.5 hours. (Make sure you really stir well so the granola on the edges don't get too brown).
(I recommend lining bottom of your oven with foil as you may spill some oats while stirring.)
Remove from the oven and cool on baking sheet. When cool, put in a bowl and add the dried fruit and cashews (if using). Cool fully before storing in airtight container.

Granola is a very forgiving blend. You can easily vary the amount of sweetener; combine honey & maple syrup and play around with the add-ins. I don't recommend reducing the oil though as you need to get the oats well-coated. I have used a dark chestnut honey in my granola a few times, and highly recommend it if you like a very rich, earthy flavor.

August 17, 2008

Festival of Maize


We were up in Columbia County, New York this weekend. FARM country! I love it. So, I went a little crazy at the farm stands. I know there are women who get excited by sales at Saks or the deals at overstock.com. For me, it's farm stands. I can't hold back. I need to buy, buy, buy. I purchase a little bit from each place, trying to spread my farm-stand-love around. It takes a real effort not to pull the car over at *every* *single* farmstand. My husband knows by now that he shouldn't even ask - he just slows down as soon as the "Fresh Produce Ahead" sign appears on the side of the road. Because, yup, I'll need to stop and see what they've got.

So, I went here and here and here and a few other unnamed, non-websited places. The selections were amazing - all kinds of tomatoes (heirlooms at great prices!), string beans, zucchini, peaches, apricots, plums, berries, early apples - pretty much every summer vegetable or fruit was there, all of it local. Be still, my heart. Nothing beats August in the Hudson Valley in my opinion. Unless it's September in the Hudson Valley - it's a toss-up whether you'd trade the late-summer berries for the early-fall squashes, apples and pears. Fortunately, we don't have to choose as I'll be heading north again in a few weeks' time. Sure, it's nice to see my friends who live up there but really, I'm there for the farm stands. And it's okay, because they know that about me. :)

So on this spree, I bought 24 ears of corn at Samascott Orchards. Some was bi-color, some was all-white. The all-white corn is as sweet as candy. I think I might actually need to make sweet corn ice cream because this corn is perfect for it.

My kitchen was a corn workshop today. I shucked a bunch of ears and froze the kernels for chowder later in the season. Then I made corn stock from the cobs ,which then went into corn soup with 2 quarts of stock leftover for the freezer.

I also made Dorie's fresh corn muffins, which are incredible with fresh corn. I've made them in the past with packaged, frozen corn and they were just not the same. I also baked them in jumbo muffin tins and I think they work better on that scale. They were so tender and moist.

Then we had some corn on the cob with dinner tonight. Can you believe I still have more corn in the fridge?? I am starting to feel like we live on a cornfield. Not that I'd have any problem with that! Bear in mind, there are just 2 of us in my house. And I bought 24 ears. Thank god corn is cheaper than Manolo Blahniks or we'd really be in trouble.
Among my other purchases, was heavy cream from a local dairy. Ooooh the cream, the cream!! This is the real McCoy. Thick globs at the top of the glass bottle, a rich creamy flavor with no hint of cardboard or over-pasteurization. Perfect for a fresh apricot ice cream. More about that on Tuesday, when I'll also report on the granola grabbers for TWD.

And I leave you with some sexy apricots:


I send out a big thank you to my fellow food blogger Jaime at Good Eats n Sweet Treats. Jaime gave me some really helpful advice on how to use my camera - thank you for making my blog look better, Jaime! Go check out her blog, she has great photos and recipes.

August 13, 2008

TWD: Blueberry Ice Cream


So, I'm a day late (and many dollars short) with my post for TWD, but I served the blueberry sour cream ice cream Tues night and it was hard to get the post up until now. I made this ice cream once before and though I love the flavor and the ease of preparation, I still think a custard-based ice cream results in a creamier texture. Nevertheless, this is still a great recipe and I love the tanginess of the sour cream as a change from the eggs-and-cream standard base.

I actually used 1/4 cup sour cream (because that's all I had) and 1/2 cup full-fat Greek yogurt but I think the yogurt tastes almost identical to sour cream so there was no difference. I used lots of lime juice - almost 3/4 of a lime as opposed to 1/4 lime and still didn't taste as much lime as I would have liked. I think the citrus quotient could be significantly upped.

The Summer Fruit Galette made an encore appearance:

This time, I used plums and blackberries and significantly more custard. It was delicious, again, but I think the apricots would always be my first choice if available. My farmer's market fruit stand said their season is over already - so sweet but so fleeting!

I had also made a vanilla & wild raspberry swirl ice cream last week after picking 3 quarts of wild raspberries in the woods. We served both with the tart. Wild raspberries are AMAZING! Oh my goodness - they are nothing like the ones even from farm stands, let alone the grocery store. I can't describe the texture - they're sort of like little silky pearls of jammy goodness. You just have to taste them to experience it. My friend Howard showed me several spots where there are hundreds (or more) of wild raspberry bushes. If the day had been cooler and I wasn't sweating buckets, I could have picked for half the day and ended up with several gallons - all for free! When they're running $4.50 for a half-pint, it's well worth the effort.

This week's recipe was chosen by Dolores of Chronicles in Culinary Curiosity and you can find the recipe on her blog.

On a side note, I ordered bulk vanilla beans today from The Organic Vanilla Bean Company. What a bargain! I got a mixed sampler of 40 beans for $18. They normally cost me $1.50-$2 each, so this is about 75% off. And they're organic, too! I am excited to start using vanilla bean in more recipes. I normally hold back because of the expense but now I predict a bit of a vanilla obsession will take hold in my kitchen. I am even planning to try making my own vanilla extract once I have enough used beans accumulated. I found guidelines for making your own extract here. If you're wondering what you might get for Xmas from me this year, think vanilla.

Have a great week, everyone!

p.s. thanks to herb for the photos this week!

August 3, 2008

TWD: Black & White Banana Cupcakes


For this week's TWD, I decided to double the fun...

Ashlee of A Year in the Kitchen chose Dorie's Black and White Banana Loaf Cake. I have been on a bit of a cupcake tear lately (what else is new??) so I decided to make cupcakes instead of a loaf. I frosted the cupcakes with a swirl of Dorie's bittersweet chocolate ganache and topped them with banana-honey chips. But did I stop there? No, siree. It seems I needed even more chocolate and even more banana on the plate. So I got out the ice cream maker and made Roasted Banana Ice Cream from David Lebovitz's fantastic book, The Perfect Scoop. I added in his fudge swirl for a marbled ice cream to mirror the marbled cupcake.

Here's the dynamic duo, Black & White Banana Marble Cupcakes with Roasted Banana-Fudge Swirl Ice Cream - what a mouthful!


To marbelize the cupcakes, I alternated dollops of each batter horizontally & vertically, and then swirled with a knife. They look like black & white cookies in the cups, don't they?


Ta da! Marbled cupcakes! I think they look really cool inside:


I baked the cupcakes for 20 minutes at 350 (as opposed to 90 minutes+ at 325 for the loaf cake). I had made this cake about a year ago and it came out underbaked despite a long baking time. While the cupcakes were not undercooked this time, I still found the texture a bit rubbery. I think there must be some flaw in the recipe -- too much liquid maybe? I scaled back the amount of banana to help with that problem but I just think there's something messed up with the proportions - maybe too much milk? Who knows...I doubt I would use this particular recipe again but I have to say that marbled cupcakes are pretty cute, so I'll be doing that again for sure.

And the ice cream? Deeelisssshuuuus. The bananas are roasted with butter and brown sugar before pureeing with whole milk, sugar, lemon juice and vanilla. I have thought banana ice cream to be a bit bland in the past, but with the fudge swirl added, that's not an issue at all. The texture was a bit grainy, despite my pulling it from the machine at 13 minutes instead of the usual 20 minutes, but the flavor is great.

I'm wondering if the fact it was a fruit & milk recipe only, instead of a custard with cream & eggs, caused it to be grainier or if 13 minutes was still too long for this particular ice cream. I'll have to try it again sometime to figure that out.

Next week's TWD bring us even more ice cream - yea! Check back for Blueberry Sour Cream Ice Cream next Tuesday.


P.S. A blogger's plea for help! I am having a lot of trouble with my digital photography. If anyone can give me some advice on getting good close-ups indoors, I'd love to hear from you. I use a Canon SD400 point & shoot. I find that when I use the digital macro setting, the shots are often blurry but I keep reading that I should be using macro for the best shots. And I have a terrible time with the flash. If I use the flash, it's too bright and if I turn it off, the shots are either blurry or dark. I don't know if this is something that can be easily resolved or not. I have better luck when I shoot outside, but I'm usually doing my baking shots at night. I have signed up for a class in September which might help but in the meantime I am desperate for any advice, help, suggestions, etc. Please get in touch if you think you can help me out!

July 29, 2008

TWD: Summer Fruit Galette


Wow, is this a good recipe! This week's entry for Tuesdays with Dorie is Summer Fruit Galette, chosen by Michelle of Colorado Springs . You can find the recipe on her blog. And if you don't own the cookbook, I highly recommend going over there and printing that recipe out. And making it sometime soon. Like tomorrow. And then inviting me over. Did you know that I'm free tomorrow for tart-eating?

Almost any fruit will work in this galette, so I used two that were at the farmer's market last weekend -- apricots and blueberries. I seem to have a blueberry-buying problem, so it's no surprise that this had them in it. (I over-buy blueberries every week - not sure where this comes from. I was never denied blueberries as a child; in fact, we ate them often in the summer. Is it another Willie Wonka thing? All I know is that every week I'm trying to figure out how to consume all the berries in the fridge before they rot. I am eating an inordinate amount of blueberries - pints upon pints. Kittydad does not help in this antioxidant effort of mine, as much as I try to enlist him. So I'm on my own with an entire blueberry bush's output every week. And yes I do own a blueberry cookbook, but I always seem to forget I own it until after I've eaten the last berry. Then I say "Well, I'll just have to buy more blueberries next weekend and make xxx recipe!" Which recipe I then promptly forget about, leading to more blueberry-overflow the following week. Fortunately, blueberries do not have the same properties as asparagus - that would be weird.)

But, I digress. Since I had wanted a bit of almond in the Cherry-Rhubarb Cobbler last week, I decided to add a touch of almond extract to the custard. Like many other TWD bakers, I didn't use all of the custard called for in the recipe. I really should have saved it, though, because I may need to make this sucker again sometime soon. Like tomorrow.

I wish I had kept the fruit a bit more in the middle of the tart and had more sides to fold over and make it prettier - I'll remember that tomorrow, er, I mean, next time. I wanted mine to look more like Carla's.

But who cares, it tastes incredible. One thing I really like about this type of tart is that the fruit goes all the way into the corner of the crust, so you don't get a big hunk of just-crust at the end of the piece, like you do with pie. And because the filling is not as deep as a pie's, the bottom crust stayed nice and crisp.

I used strawberry jam on the bottom cuz that's what I had in the fridge, and I used the graham cracker crumbs. But, after I tasted the almond flavor, I thought that ground nuts would work well, too. Cooked apricots are super yummy, by the way. I'm so glad I caught the end of the season for this tart.

All in all, an outstanding tart and this is exactly why I joined TWD. Because I might never have tried that recipe on my own. I tend to avoid tarts and head straight for pies. Well, that won't happen....tomorrow!

July 28, 2008

GoGo Boots is Home!


(GoGo Boots & Pumpkin - reunited again!)

We were able to get GoGo Boots back inside the house on Saturday night. For those who might be curious, the only method that worked was as follows: We turned off all the lights in the house, opened the kitchen door and sat completely silent. We heard him rustling in the leaves on the side of the house and not more than 10 minutes later, he was inside. He came tearing in like a lightning bolt and ran upstairs immediately. His brother Pumpkin ran up after him and the two of them spent the next 24 hours curling up and washing each other. Pumpkin clearly missed his brother very much and was so happy to have him home. As are we, too!

The 2 days he was missing were one of the worst times in my life. I love this little boy so much and couldn't bear the idea that he was outside, all alone and scared. This is not a cat who was off exploring and adventuring. Our guess is that he was absolutely terrified - so scared that he didn't even respond to our calls because he was too afraid. We still don't know how he got out, but we just hope it never happens again! He has blisters on his poor little paws and has been sleeping most of the time. I don't think he slept a wink outside.

Welcome home, GoGo Boots!

July 24, 2008

My Baby is Missing


Hi everyone. Please send lots of good thoughts out into the universe to help us find our lost kitty, Go Go Boots. GoGo has not been outside since we rescued him 5 years ago, at age 3 months. Our cleaning woman was here today and although she says she never saw him get out, the only explanation is that he snuck out while she had the door open at some point. We have spent all evening combing the area for him. I am heartsick. He has never been alone in his whole life, as we also rescued his brother. They are inseparable. He is also a total mama's boy and follows me everywhere, sleeps with me, etc. I can't stop worrying about him out there all alone, with no food and no idea how to get back home.

I keep hoping he will just show up, and maybe he will by the morning, but it's so hard to think he may be gone forever.

Sorry for the depressing post but maybe if everyone thinks "go go boots come home", it might help.

Thanks.

July 22, 2008

TWD: Cherry Rhubarb Cobbler

(The cherries & rhubarb before it all went so wrong...)


(It looks promising coming out of the oven, doesn't it? Don't be fooled!)

I love cherries. I love rhubarb. I love cobbler. So the odds were high that I would also love this week's entry for Tuesdays with Dorie, Cherry Rhubarb Cobbler, chosen by Amanda of Like Sprinkles on a Cupcake .

But...I have to say...no love here for this one. Not even any "like" for this one.

Where to start...whole wheat flour in cobbler topping? Not a winner. I think the depth of the flavor fights with the fruit. Ginger in both filling and topping? I am a big fan of ginger, but with these fruits, not so much. I would have preferred a touch of almond extract or vanilla bean perhaps. My cobbler was also hobbled (hah) by slight under-cooking. I was mortified to realize, when serving it up, that the underside of most of the topping was still a bit raw despite 45 minutes of baking and looking golden brown on top. Maybe I was fooled by the naturally darker color of the whole wheat dough? The fruit wasn't fully cooked either. Oy. You really shouldn't have to chew rhubarb, it should just melt in your mouth. Undercooked rhubarb is pretty under-yummy.

And as for the look...well, I'm not sure why 20 blobs on a 8x8 square is a good idea. I would have done fewer blobs of dough, or rolled it out for a nicer look. The thing just looks sort of homely, don't you think? I mean, I know cobbler is a home-y dessert but still...it's just kinda sad looking.


(My homely homey cobbler)


Regardless, my family members ate every scrap on their plates -- dad even went back for seconds and wanted to keep all of the leftovers.

I know there were a lot of TWD bloggers who were not familiar with rhubarb before this recipe. I hope this doesn't turn them off forever -- instead, they (and everyone else) should try Dorie's Double Strawberry Rhubarb Crisp which is fantastic.

So, not a great report card today for TWD. I give it a C-.


And p.s., kittydad usually photoshops my sub-par photos but I am late getting this posted before deadline - maybe we'll fix them later (or not).

July 20, 2008

Believe the Hype!


YES! My days of searching for the perfect chocolate chip cookie recipe are over. That's right, folks, the cookie of my dreams made its debut in a New York Times article published two weeks ago. I am here to state emphatically that the cookie is awesome. Chewy on the inside, a bit crunchy on the edges and with something indescribable about the texture. The balance of flavors is just right and I don't think I've ever made, or eaten, a better cookie than one of these fresh from the oven.

Unfortunately, I fell down on the photography aspect. I took some really bad, unprintable shots of batter and didn't do much better with the finished product, aside from the one shot above. Note to self: keep reading that camera manual. With the next batch, I'll try to take more shots and add some to this post for an after-market upgrade.

And now, with no further ado, the recipe:

Perfect Chocolate Chip Cookies
Adapted from The New York Times and Jacques Torres

2 cups minus 2 Tbs non-rising cake flour
1-2/3 cups bread flour
1-1/4 tsp baking soda
1-1/2 tsp baking powder
1-1/2 tsp kosher salt
2-1/2 sticks sweet butter (1-1/4 cups), room temp
1-1/4 cups light brown sugar
1 cup plus 2 Tbs white sugar
2 large eggs, room temp
2 tsp vanilla extract
1 to 1-1/4 lbs bittersweet chocolate chips, chunks or feves
(minimum of 60% cacao content, best brand possible)
Optional: 1 cup chopped, toasted pecans or other nuts
Sea salt for sprinkling

1. Sift flours, baking soda & powder into a bowl. Whisk in the kosher salt. Set aside.

2. Using a mixer with paddle attachment, cream the butter and both sugars together until very light, at least 5 minutes. Add the eggs, one at a time, mixing well after each addition. Add vanilla on low speed.

3. On low speed, carefully add the dry ingredients and mix just until combined, 5-10 seconds. Don't worry if some flour isn't incorporated. Drop in the chocolate pieces and nuts (if using) and do a final blending with a rubber spatula. Make sure all flour is mixed in but don't over-mix.

4. Cover the dough well, pressing plastic wrap right on top of the dough and then also covering the bowl. Refrigerate for 24-48 hours, preferably at least 36 but no more than 48, for best results. Dough can be chilled up to 72 hours if necessary but will be best between 36-48 hours.

5. When ready to bake, preheat oven to 350. Set racks in oven to top and bottom thirds. Line 2 baking sheets with parchment paper, a non-stick baking mat or foil. Scoop out balls in whatever size you like (I use a 2-Tbs ice cream scoop). Press down slightly with palm to flatten a bit. Sprinkle lightly with sea salt and bake until golden brown, about 14 minutes, switching the sheets front & back and top & bottom half-way through for even baking. Do not overbake! The cookies should look a bit underdone when they come out, with very light golden bottoms. Let cool on trays for at least 5 minutes and then transfer to cooling racks.

For the original recipe, click here.

A few technical and not-so-technical notes:

1. The recipe calls for two kinds of flour that you might not have at home. I have not yet tried to make it with only all-purpose flour to see if it's the flour that counts. And unfortunately the article did not explain why exactly this combination of flours might make a difference. But I have to say that I'm not sure I want to mess with it -- I know it works. As for why, really, does it matter?? Just enjoy them.

2. The original also calls for Valrhona "feves" which I couldn't find, even at my local Whole Foods. The best price I found online is at Surfa's. I used Ghiradelli 60% bittersweet chips which are available at most grocery stores. I recommend using the best brand you can find.

3. I baked my first batch after 42 hours of resting time, then at 60 hours and again at about 80 hours. The first batch was definitely best and confirms what the original recipe states, that about 36 hours is ideal.

4. I ignored the part about making enormous cookies in the original recipe. They're just too big for normal eating, hard to pack up to give away and too much temptation for me.

5. I forgot to put the sea salt on my first batch and didn't really miss it. I think you could just put a smidgen more salt in the batter, or skip it. It's a nice touch, but even for a salt-lover like me, I didn't find it necessary.

6. The original recipe calls for 1-1/4 lbs of chocolate. I used just under a pound because I don't like too many chips in my cookies, and for me it was just right. But I know many people like more chocolate so use your own judgment.

7. I think pecans would be a nice addition if you like nuts in your chocolate chippers.

8. The resting time in the fridge is important. I have always chilled my chocolate chip cookie dough before baking, if I have time. Years ago, at one of my catering jobs, I asked the pastry chef why the cookies baked up chewy one day when they had been crispy the day before; she said if the dough was cold, the cookies would be chewier. She was right (of course) and the article explains the science behind why this is true. I will say that resting time alone does not create a chewy cookie, because I have made ones that were still too thin & crispy for my taste even after chilling but it's definitely one contributing factor.

If you're still with me at the end of this very long post, please let me know if you make the cookies and how they turn out! I'd love some feedback.